Saturday, May 12, 2012

Romantic Sunset

Inspired by Rousseau and the Grimm Brothers and other Romantic people I've learned about in European History. 

*Click on any of the screenshots or animations in order to enlarge them. 

Finished Result: left: before; right: after

I am not able to find the link to the photo I used. If you know what it is, please tell me in the comments. :)

1. Open your image. 
2. Go to Layer - New Adjustment Layer - Gradient Map. Select the Purple - Orange gradient. Set the blend mode to 'Color'. 


3.  Go to Layer - New Adjustment Layer - Levels:

Red Channel-
input: 48, 0.66, 243
output: 0, 255
Green Channel-
input: 3, 1.62, 255
output: 0, 241
Blue Channel-
input: 34, 0.78, 238
output: 65, 255


4.  Duplicate the image layer on the bottom of the layer stack. Drag it to the top of the layer stack and set the blend mode to 'Screen'. 

5. Go to Layer - New Fill Layer - Gradient. Select a Black - White gradient. Set the style to 'Radial' and make sure 'Reverse' is checked. Set the blend mode to 'Soft Light'. 


6. Make sure the top gradient layer is selected and on your keyboard hold down 'Ctrl + Alt + Shift + E'. 

7. On this new layer, go to Filter - Render - Lighting Effects. If you're using Elements 10, select the '2 o'clock Spotlight' preset. If you don't have it, set your settings to mine. 


You're done! :)

Saturday, January 14, 2012

Glassy Text Tutorial

I've always loved the look of glassy text and I wanted to find out how to recreate the effect using only Photoshop Elements. This is what your final result will look like:


1. Open up the texture or photo you are going to be applying the text to.


2. Select the 'Horizontal Type Tool' and set the font and size to your preferences. I'm using Garamond, 48pt. Make sure the color is black. Then click on your texture/photo and type whatever you want.

2a. Make sure your text is centered. In order to do this you can either use 50% horizontal and vertical guides with the 'Snap to...' option checked or you can create your text in other document so when you copy it and paste it on your texture/image it will be centered.


3. With your text layer selected, in the Effects palette, click on the Layer Styles thumbnail. Then from the drop down menu select 'Glass Buttons' and click on the one that says Translucent Glass.

4. Double click on the fx icon that is now on the text layer and set your settings to mine.

5. Click OK. Then, still on the text layer, set the blend mode to 'Soft Light' and set the opacity to 95%.

6. Duplicate the text layer and simplify it by right clicking the text layer and clicking 'Simplify Layer'. Right click the layer again and click 'Simplify Layer'. Rename this layer 'depth'.

7. Reset your color swatch to default by pressing the 'D' key on your keyboard. Then go to Filter - Sketch - Bas Relief. Set the Detail to '12', the Smoothness to '2' and the Light to 'Left'.

8. Go to Enhance - Adjust Lighting - Shadows and Highlights. Match your settings to mine below and click 'OK'.


9.  With the 'depth' layer still selected go to Filter - Blur - Gaussian Blur. Use a radius of '1'. Click OK.
10. Go to Filter - Render - Lighing Effects. On the presets drop down menu select 'Soft Omni' and on the preview position the lighting where you want it to be. I've positioned mine on the center of my text. On the 'Texture Channel' select the current layer you're working on.


10. Select All (Ctrl + A) and copy (Ctrl+C). Create a layer mask and Alt + click on the layer mask thumbnail. Then paste (Ctrl+V). Then deselect (Ctrl + D).


11. Still on the layer mask, go to Enhance - Adjust Lighting - Levels. Set your settings to match mine below.


12. Go to Layer - New Adjustment Layer - Brightness and Contrast. Set your settings to match mine for the Brightness. For the Contrast, but moving the slider to the left you can achieve a softer look, while moving it to the right will result in a more defined look.Then go to Layer - Use Previous Layer to Create Clipping Mask (or Group to Previous if you're using an earlier version of Elements).


13. In your layers palette, click on the original text layer you created in step #2. Go to Layer - New Fill Layer - Solid Color. On the dialog that comes up select 'Create Clipping Mask with Previous' or 'Group to Previous', or whatever the equivalent.. Then for the color, use #00c5c7. Lower the opacity for this layer to 25%.

You're done! :) You can see how mine turned out below after some tweaks. The lyrics are from the song Smile by Uncle Kracker.

Saturday, December 24, 2011

'Domino' Photo Manipulation

In this tutorial you will be creating a graphic that represents the song Domino by Jessie J.


Resources:
- Landscape photo
- Moon stock
- Glitter brushes
- Silhouette
- Dominoes stock

Before you start the tutorial make sure all of your stocks are open besides the landscape photo. Also make sure you've unzipped the brush pack.

Friday, December 2, 2011

Vintage Wash Effect

So we're going to be achieving the transition below in Photoshop Elements 10. If you want to use the same photo as me click here [x].


1.  De-saturating:
a. Go to Layer - New Fill Layer - Color. Type in #000000 (black) for the color. Click OK.
b. Set the blend mode of this layer to 'Color' and the opacity to 70%
2. Vintage Look:
a. Go to Layer - New Fill Layer - Color. Type in #075349 (teal) for the color. Click OK.
b. Set the blend mode of this layer to 'Exclusion' and the opacity to '30%'.
3.  Blue Wash:
Go to Layer - New Fill Layer - Color. Type in #00e3ff (bright blue) for the color.
b. Set the blend mode of this layer to 'Soft Light' and the opacity to '75%'.
4. Brightening:
a. Go to Layer - New Adjustment Layer - Levels. Set the input levels to '0', '1.00', and '230'.
5. Blowing It Out:
a. Click on the background layer which should be your original photograph. Duplicate this layer by pressing Ctrl+J on your keyboard and drag the duplicated layer to the top of the layer stack.
b. Set the blend mode of the duplicated layer to 'Screen'.
6. Warming Filter:
a. Go to Layer - New Adjustment Layer - Photo Filter. Use the default filter (i.e. Warming Filter (85)) and set the density to 50%. Make sure 'Preserve Luminosity' is checked.

That was it! :) It's a short, sweet effect, but it really does look quite nice. Especially on certain photos.

Saturday, October 15, 2011

Retro Urban

Learn how to create 'retro urban' looking photographs and apply the same technique to close up and abstract photos to create your own textures. The possibilities are endless. Top - before. Bottom - after. Image from istockphoto. 


1) Turn your photo to a high-contrast black and white.

1a. Go to Enhance - Adjust Color - Remove Color. [Shift+Ctrl+U]

1b. Go to Enhance - Adjust Color - Adjust Color Curves...


Look at the picture above for reference. Depending on your photograph you're going to have different settings. Basically you want to move the Highlights and Midtone Brightness sliders toward the right and the Midtone Contrast slider toward the left. To what extent you move your sliders depends on your photo. You want fairly high contrast, but you still want to be able to differentiate the details. For the Shadows slider you will rarely move the slider toward the right (only if your image is still very 'black' after pumping up the brightness) and if you do move it to the right, you will only a tad. More likely, you'll either leave it in the middle or move it to the left until the blacks stand out nicely.

I used the settings above. And here's how my black and white photo turned out:

2) Add the 'Urban'.

2a. Go to Layer - New Fill Layer - Solid Color. Choose #070736 (a dark blue). Click OK. Set the blend mode of this layer to Screen and the opacity to 79%.

2b. Go to Layer - New Fill Layer - Solid Color. Choose #86eefe (a bright turquoise). Click OK. Set the blend mode of this layer to Soft Light and the opacity to 79%.

3) Add the Blocks.

3a. Create a new layer. Using the Paint Bucket Tool, fill it with #808080 (50% gray).

3b. Go to Filter - Stylize - Extrude.


Depending on the size of your image you will set both the size and depth to a number between 50 and 200 pixels. Make sure you set both the size and depth at the same number.

My image is approximately 3000 by 2000 pixels and I'm using 200 px.

3c.  Go to Filter - Stylize - Glowing Edges. [consult table below.]

3d. Go to Filter - Blur - Gaussian Blur. [consult table below.]

Extrude Size/DepthGlowing Edge Width, Brightness, and Smoothness ValuesGaussian Blur Radius
50 px3, 10, 91 px
100 px4, 10, 101.5 px
150 px5, 10, 113 px
200 px7, 10, 125 px

3e. Set the blend mode of this layer to 'Screen'.

3f. If you have a lot of shadow in your photo you might want to mask out some of the effect. I added a mask and painted on the bottom:


4. Add Texture.

4a. Create a new layer and fill it with #808080 (50% gray). Go to Filter - Texture - Patchwork.

Depending on your image size you want to use one of the settings below:

Square SizeRelief
210
414
613
816
917

For my size I've used 9 and 17 for the Square Size and Relief respectively.

4b. Set the blend mode of this layer to Overlay and the opacity to 62%.

4c. Create a layer mask for this layer. Click on your background black and white layer. Select All (Ctrl + A), copy (Ctrl + C) and while holding down the ALT key on your keyboard click on the layer mask that you created at the beginning of this step. Paste (Ctrl + V).

4d. Go to Enhance - Adjust Lighting - Levels. Set the input values to the following: 0, .50, 179.

5. Add the 'Retro'.

5a. Press Ctrl + Alt + Shift + E. This will duplicate all visible layers and create a merged copy.

5b. Go to Filter - Render - Lighting Effects.... Set your settings to match the ones below. Click OK.

5c. {optional} Duplicate this layer. Apply the filter again (Ctrl + F) and set the duplicated layer's opacity to 63%.

You can also experiment with using this effect on random shots and then using it as a texture over another photo. Annoying I cannot remember exactly what settings I used on the photo below in terms of blend mode, etc. However, I think it could have been overlay. :/ I also added some color layers at different blend modes, masked out some area, and added a white vignette.

[this photo retro-urbanized] + [this photo] =

Saturday, September 24, 2011

Speckled Vintage

The 'Speckled Vintage' effect is basically gives you a washed out vintage look with speckles. It worked awesome on people and nature shots. Enjoy. :D 

Before:


After:


1. Open your image (I'm using a picture from www.free-celebrity-picture.com) and duplicate it so the original won't be affected. Name this layer 'Work Layer'.
2. Go to Layer - New Fill Layer - Solid Color. Fill with #002157 [a dark blue].
          2a. Set the blend mode of this layer to 'Exclusion' and the opacity to 64%.
3. Go to Layer - New Adjustment Layer - Photo Filter. Choose the 'Sepia' filter, move the density slider to 70% and make sure 'Preserve Luminosity' is checked.
4. Go to Layer - New Adjustment Layer - Gradient Map. Make a #381a38-white gradient as shown below.


          4a. Set the blend mode of this layer to 'Screen' and the opacity to 64%.
5. Go to Layer - New Adjustment Layer - Brightness/Contrast. Set the 'Brightness' to -13 and the 'Contrast' to +69.
6. Click on 'Work Layer'. Duplicate it by either going to Layer - Duplicate Layer... or by pressing Ctrl+J on your keyboard. Name this layer 'Speckles' and drag it to the top of the stack.
          6a. Compare your layers palette/panel to the one below.


7. With the 'Speckles' layer selected, go to Filter - Sketch - Reticulation.... Set the 'Density' to 38, the 'Foreground Level' to 24, and the 'Background Level' to 21. Click OK.
8. Select the brush tool [B] and choose a medium sized, soft, white colored brush with an opacity of about 70-75% and go over the face. Then lower the opacity to around 30-35% and go over any other areas on skin where many speckles have clustered.
          8a. Below is my before (top) and after (bottom) regarding 'speckle cleansing'. I went over the face and arm. Click on the thumbnail for a larger preview.


9. Set the 'Speckles' layer to a blend mode of 'Hard Light' and an opacity of 48%.
          9a. Feel free to touch up the 'speckle cleansing' or adjust the opacity.

10. Go listen to the awesome song Every Teardrop is a Waterfall by Coldplay that inspired me to make this tutorial. :)

You can also apply this effect on photos with other subjects besides people. Simply omit step 8 or apply it as needed depending on your photo. Here's an example on a photo from istockphoto:

Tuesday, June 28, 2011

Sunshine Lomo Effect

It's been forever since I posted, so I've decided to change it up a little before updating again.

Instead of frequently uploading papers and elements, I'm going to stick to occasionally (every month or so?) giving out overlays, textures, or brushes for download.

I am going to try to post a tutorial every week. It could be short, long, or in between. It could be about digi scrapping, photo editing, or graphic making. This particular one is on how to achieve a 'sunshine lomo effect'.


In this little tip we'll make the transition from this


to this


1. Open up your photo in Photoshop Elements. This technique works best with outdoor sunny shots.
2. Duplicate your background layer and hide the background layer (because you don't want to make any changes on the original).
3. Duplicate this layer again.
4. Go to Filter - Render - Lighting Effects.
5. Adjust your settings so it is similar to mine.


6. On the left hand side click the point where you want most of the light to be focused. In this particular photo, I'm focusing the light where the boat is.
7. Click OK.
8. Now you will notice that most of the photo darkens with only the part you selected (in my case the boat) lighted up. Use a large soft eraser to erase the dark parts. Do not erase the bright spot.
9. Right click on the light spot layer in your layers palette/panel and select 'Merge Down'. Now you will have one layer with both the photo and light spot.
10. Duplicate this photo/light spot layer and go to Enhance - Convert to Black and White
11. Select 'Infrared Effect'. Then click OK.
12. Set the blend mode of the B/W layer to Luminosity.
13. Go to Layer - New Adjustment Layer - Hue/Saturation.
14. Lower the Saturation to -30.
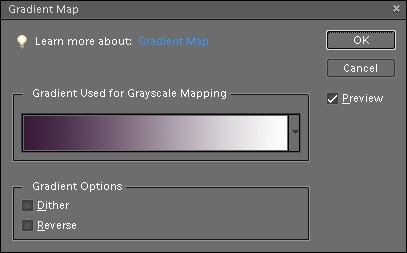
15. Click OK. Then go to Layer - New Adjustment Layer - Levels. Click the drop down menu at the top that says RGB to switch to different channels. We will be altering the settings of all the Red, Green, and Blue channels individually. Alter your settings to match the screenshot below.


16. Right click on any layer and select 'Merge Visible'. This will merge together all the layers except the original Bakground layer.

17. Go to Filter - Correct Camera Distortion. Under the Vignette options move the slider significantly to the right for a bright vignette.


18. You are done. :)

For this particular photo I decided I wasn't that satisfied with the final result. It was too lomo, and less sunshine for me. Plus I wanted to add some pink hues to bring back that 'rising sun' color from the original.

So, during step #5 I positioned the light near the horizon and click OK.

Then I reapplied the lighting effects filter, this time at the boat with the Intensity-Full slider more to the right. I toned down the space in between using a soft eraser set as low opacity.

After I had completed all the steps, I went to Enhance - Adjust Color - Color Variations. I selected 'Highlights' as the area I wanted to adjust, left the color intensity slider as is, and clicked on the 'Decrease Green' button once.

You can see how the final turned out below: