
The 'Speckled Vintage' effect is basically gives you a washed out vintage look with speckles. It worked awesome on people and nature shots. Enjoy. :D
Before:

After:

1. Open your image (I'm using a picture from www.free-celebrity-picture.com) and duplicate it so the original won't be affected. Name this layer 'Work Layer'.
2. Go to Layer - New Fill Layer - Solid Color. Fill with #002157 [a dark blue].
2a. Set the blend mode of this layer to 'Exclusion' and the opacity to 64%.
3. Go to Layer - New Adjustment Layer - Photo Filter. Choose the 'Sepia' filter, move the density slider to 70% and make sure 'Preserve Luminosity' is checked.
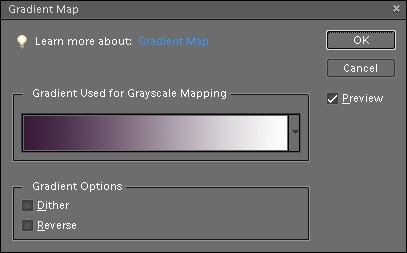
4. Go to Layer - New Adjustment Layer - Gradient Map. Make a #381a38-white gradient as shown below.
4a. Set the blend mode of this layer to 'Screen' and the opacity to 64%.
5. Go to Layer - New Adjustment Layer - Brightness/Contrast. Set the 'Brightness' to -13 and the 'Contrast' to +69.
6. Click on 'Work Layer'. Duplicate it by either going to Layer - Duplicate Layer... or by pressing Ctrl+J on your keyboard. Name this layer 'Speckles' and drag it to the top of the stack.
6a. Compare your layers palette/panel to the one below.

7. With the 'Speckles' layer selected, go to Filter - Sketch - Reticulation.... Set the 'Density' to 38, the 'Foreground Level' to 24, and the 'Background Level' to 21. Click OK.
8. Select the brush tool [B] and choose a medium sized, soft, white colored brush with an opacity of about 70-75% and go over the face. Then lower the opacity to around 30-35% and go over any other areas on skin where many speckles have clustered.
8a. Below is my before (top) and after (bottom) regarding 'speckle cleansing'. I went over the face and arm. Click on the thumbnail for a larger preview.


9. Set the 'Speckles' layer to a blend mode of 'Hard Light' and an opacity of 48%.
9a. Feel free to touch up the 'speckle cleansing' or adjust the opacity.
10. Go listen to the awesome song Every Teardrop is a Waterfall by Coldplay that inspired me to make this tutorial. :)
You can also apply this effect on photos with other subjects besides people. Simply omit step 8 or apply it as needed depending on your photo. Here's an example on a photo from istockphoto:

Original is better
ReplyDeleteYou do not say what the brush color should be in step 8. Can we assume it is white (#ffffff)?
ReplyDeleteOh, I am so sorry. I will fix it right now, and yes it is #ffffff. :)
ReplyDeleteThis is a cool technique! Thank you for writing it for others to try out. Good job!
ReplyDeleteSu
Just wanted to add that I have tried this and it turned out really nice! I used a different image, one of cogs close-up, so, following the tut to the letter, I got an almost solid-colored light-green image. The speckles were very prominent though and I liked that. I just wanted it to look more like the original - like old cogs. So, I simply changed the blending mode to 'Soft Light' on the Speckles layer. Looks wonderful!
ReplyDeleteBy the letter of tutorial-
http://i239.photobucket.com/albums/ff181/suruha/Blogs/9911_05_2686_prev-tut1.jpg
After 'Soft Light' blending mode-
http://i239.photobucket.com/albums/ff181/suruha/Blogs/9911_05_2686_prev-tut2.jpg
Thank you ever so much. I learned a new feature. Playing around with the settings, I see many more possibilities. Cool!
Su
I love your result and I am glad that you played around to find a result that you liked.
ReplyDeleteIt looks awesome. :)
3. there is no photo filter inside {layer-new adjustment layer }
ReplyDeleteThis comment has been removed by the author.
ReplyDelete@sanzipmaskey Are you using Photoshop Elements? If you go to 'Layer' in your toolbar, there will be a dropdown menu. From this menu hover over 'New Adjustment Layer'. This will result in another drop down menu. From this, choose 'Photo Filter'.
ReplyDeletelive regular in following our Eco Maxx skin care recommendations and you'll discover your self looking more youthful each day.ladies in recent times are as aware of their.For more ==== >>>>>> http://www.skinshining.com/eco-maxx-anti-aging-cream/
ReplyDeletewhen your goal is building Mega Maximusscular tissues, you want to select rcises that focus on muscle roups, which can be additionally referred to as compound physical games. For more ==== >>>>>> http://www.strongtesterone.com/mega-maximus/
ReplyDeletegiven article is very helpful and very useful for my admin, and pardon me permission to share articles here hopefully helped :
ReplyDeleteObat radang usus ampuh
Cara mengobati dismenore
Obat gondok ampuh
Cara menyembuhkan demam rematik
Obat kanker lambung
Obat demam berdarah ampuh
Obat infeksi saluran kencing ampuh